How to Make an Amazon Storefront in 5 Easy Steps


Table of Contents
- Amazon Storefront Requirements
- The Main Benefits of Creating an Amazon Storefront
- 1. A Dedicate Landing Page That's Optimized for Conversions
- 2. No Competitor Ads Allowed
- 3. A Place for Brand Messaging
- 4. Increased Visibility for Your Products
- 5. Nest Products in Categories/Sub-Categories
- 6. A Dashboard for Storefront Performance Metrics
- How to Create an Amazon Storefront (5 Easy Steps)
- Step 1: Create Your Store
- Step 2: Create Your Homepage
- Step 3: Build Your Store
- How to Add New Subcategory Pages
- How to Add a Header
- Step 4: Customize Your Store
- Step 5: Submit Your Storefront for Review
- The Best Amazon Storefront Examples
- Conclusion
The number of Amazon Prime users continues to grow YoY, and as this growth continues, Amazon continues to invest in equipping its third-party sellers to be as successful as possible; after all, if sellers are successful, Amazon will be as well.
One of the ways Amazon is helping sellers is by improving the tools and features within Amazon Brand Registry, namely the ability to create a branded Amazon storefront.
By having a dedicated place on Amazon where sellers can control their brand image, feature key products, and create a message that resonates with their audience, sellers are positioned well to be successful.
In this article we’ll discuss the requirements for setting up an Amazon storefront, the benefits of having one, how to actually create one, and some storefront examples that you can use for inspiration as you tell your own brand story.

Outclass Your Competitors
Achieve More Results in Less Time
Maximize your results and drive success faster with Helium 10’s full suite of Amazon and Walmart solutions.
Sign Up for FreeAmazon Storefront Requirements
The first step in creating an Amazon storefront is to make sure you qualify. Fortunately it’s fairly simple; all you need to do is upgrade to a professional seller account and enroll in Amazon Brand Registry (which requires you to own a trademark for your brand).
There’s a monthly fee associated with having a professional account, but the benefits far outweigh the costs when comparing professional vs individual account capabilities and overall cost / unit sold. There’s also a cost associated with getting a trademark (usually in the $250 – $750 range), but you’ll only have to pay that cost every 10 years.
Once you meet those requirements, you’ll be able to create an Amazon storefront at no additional cost!
The Main Benefits of Creating an Amazon Storefront
Due to the extraordinary amount of competition on Amazon, it’s important for every brand to stand out from the crowd. Here are some of the top benefits for those who create an Amazon storefront:
1. A Dedicate Landing Page That’s Optimized for Conversions
One of the great things about creating an Amazon storefront is the fact that you’ll have a dedicated place to send all of your online traffic that may be interested in one or many of your products. Whether it’s a link in your Instagram bio, a CTA on a TikTok ad, or an email blast out to former customers, you’ll have a centralized location that’s strategically designed with Conversion Rate Optimization (CRO) throughout so that potential customers can easily find the products they’re most interested in within your storefront.
Be sure to learn everything you can about CRO and potentially leverage a graphic designer (via Upwork or Freelance.com) to help you bring the page to life. Also be sure to reference our list of the best Amazon storefront examples below if you need some inspiration!
2. No Competitor Ads Allowed
Sponsored ads are a tool sellers use to bypass their competitors in the organic listings area of Amazon Search to gain visibility quickly for their target keywords. Fortunately competitors are not allowed to run ads on your Amazon storefront; your storefront is yours, and yours alone.
3. A Place for Brand Messaging
If you’re private labeling, it’s important that you start to cultivate a brand that people recognize and actively seek out, and your storefront is the best place to clearly communicate a vision that resonates with your Ideal Customer Profile (ICP), whether it be sustainably and ethically sourced materials, organic ingredients, your commitment to customer service, giving back to your community, etc.

Be sure to find the top brands within the niche you intend to operate in and review their storefronts to see what they’ve identified as important to their ICP for inspiration.
4. Increased Visibility for Your Products
As you grow your business, you’ll need a location to send outside traffic to, and what better place is there than an Amazon storefront? They’re likely already Amazon Prime members, and your storefront will feature all of your top products, so they could easily order your products within a couple of clicks. Minimizing the friction for a person to go from a passive viewer to an active customer allows you to generate more impulse buys. Not to mention, sending outside traffic to your storefront and product listings plays a role in Amazon SEO, meaning the more outside traffic that visits your listings and convert, the better your keyword rankings will be in Amazon search.
5. Nest Products in Categories/Sub-Categories
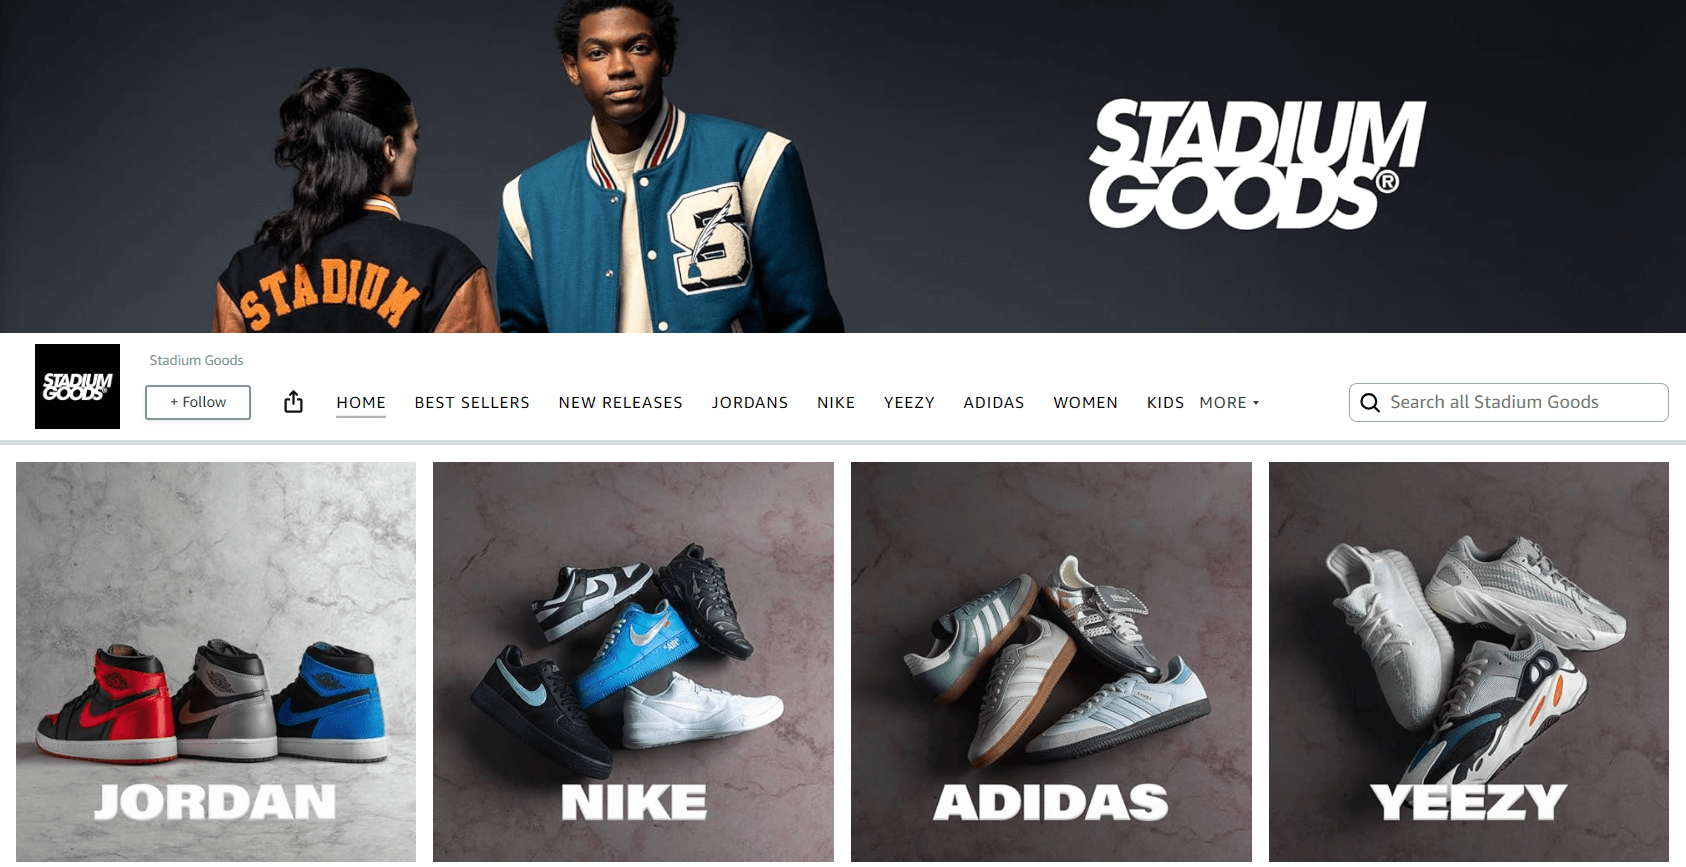
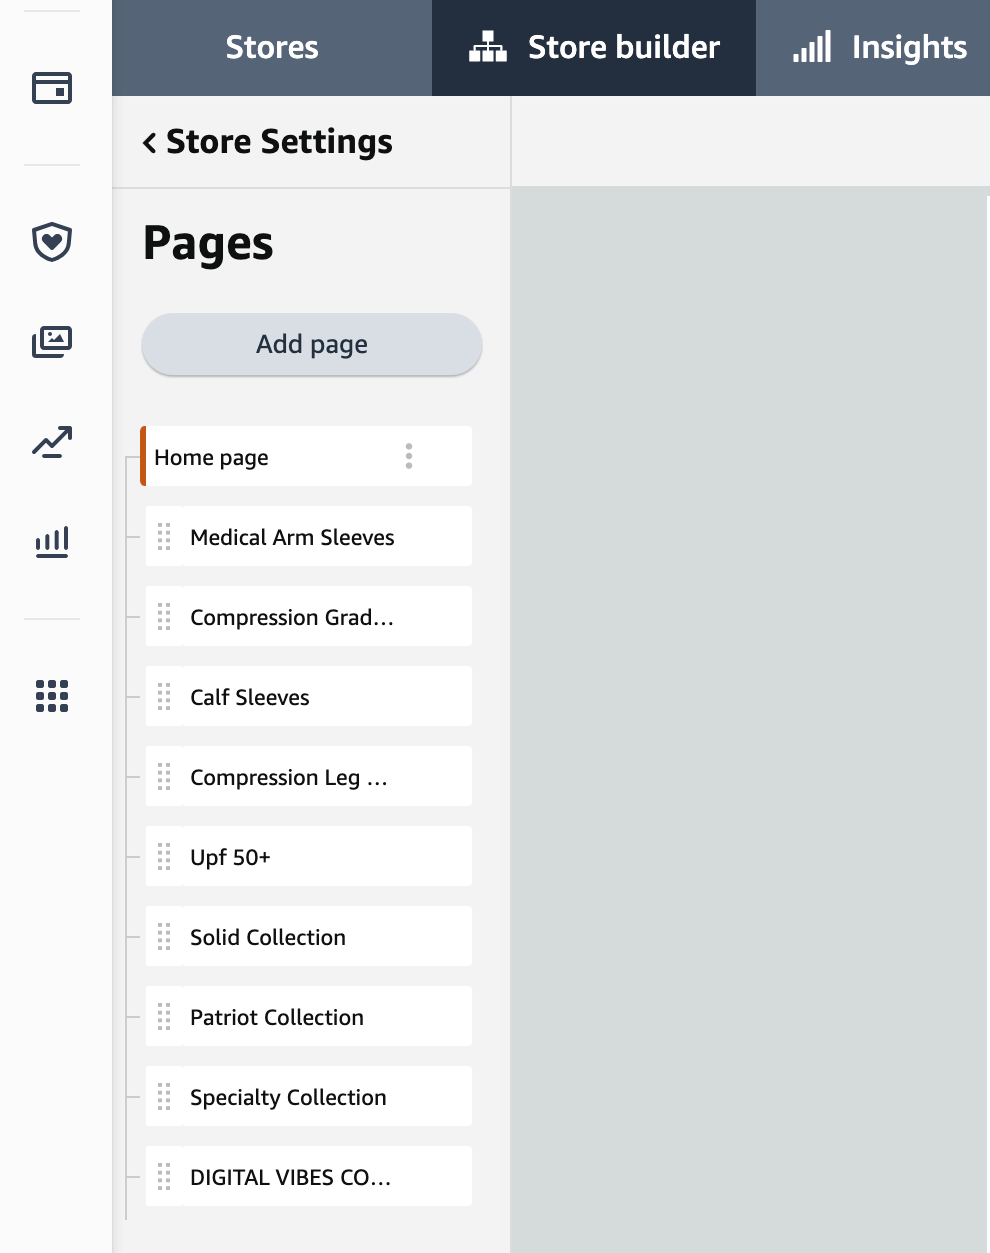
If you have a multitude of products and product types, it might make sense to nest them into various categories/sub-categories to enhance the UX and help potential customers easily navigate to the products they’re most interested in. Fortunately you can do this with your Amazon storefront (as pictured below).
6. A Dashboard for Storefront Performance Metrics
The Amazon Store Insights Dashboard helps you discover where your storefront traffic is specifically coming from along with other key features such as checking out how well your Amazon store drives sales, monitoring page views, and much more. By carefully studying these key metrics, you can then make informed decisions regarding how you market and sell your products on the site.
How to Create an Amazon Storefront (5 Easy Steps)
Step 1: Create Your Store
In Amazon Seller Central, head to the Stores tab, then click the Manage Stores button.
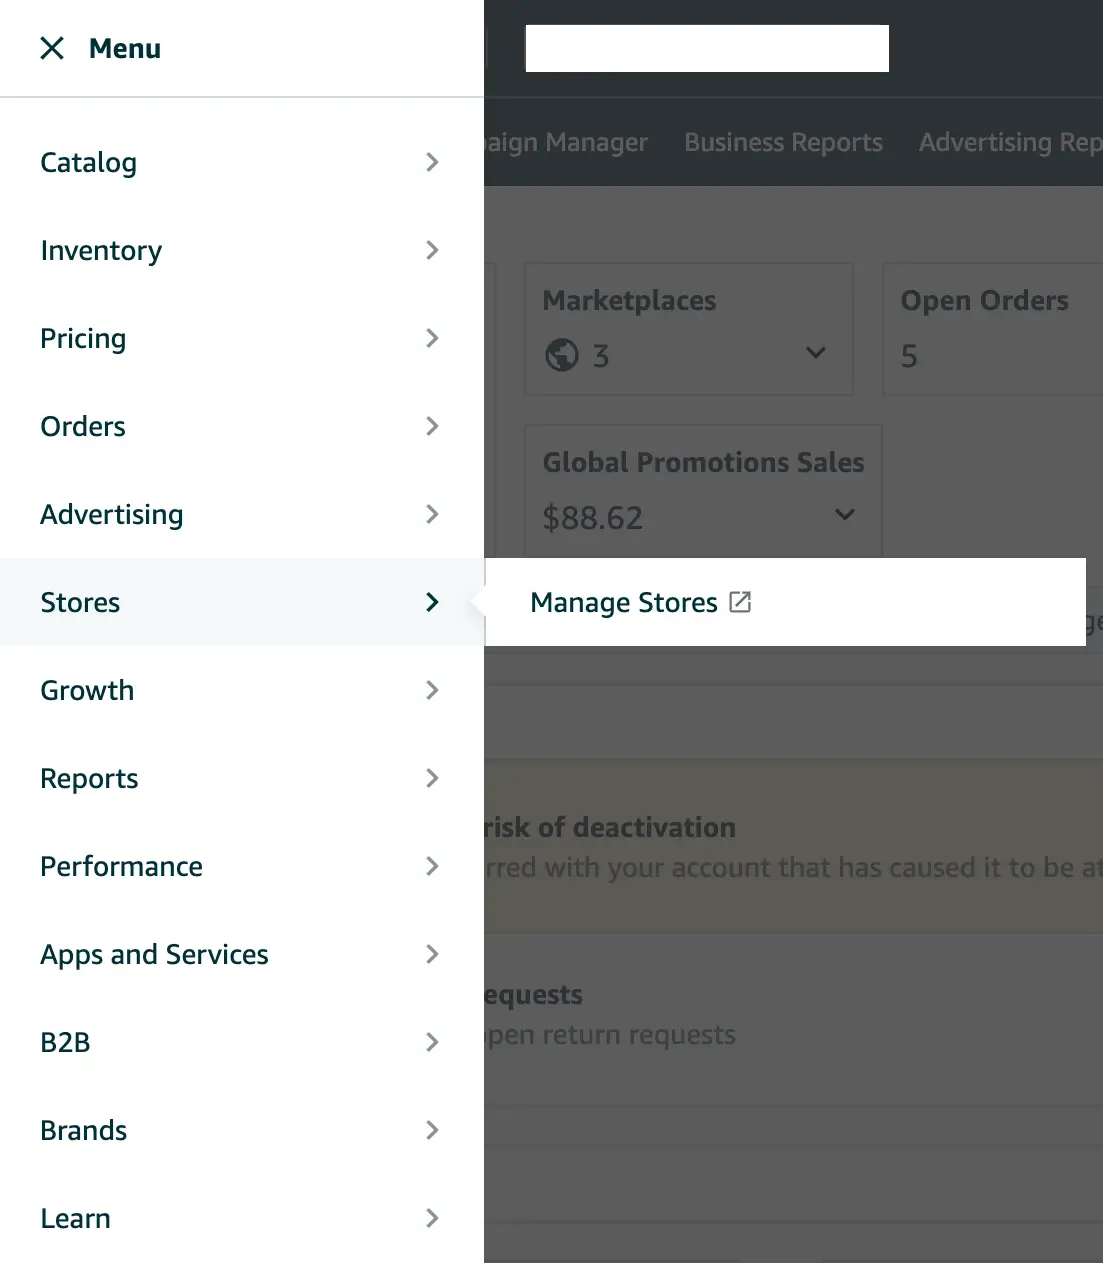
Then, click Create Store and select your brand. Keep in mind that it will only show up here if it’s enrolled in Brand Registry.
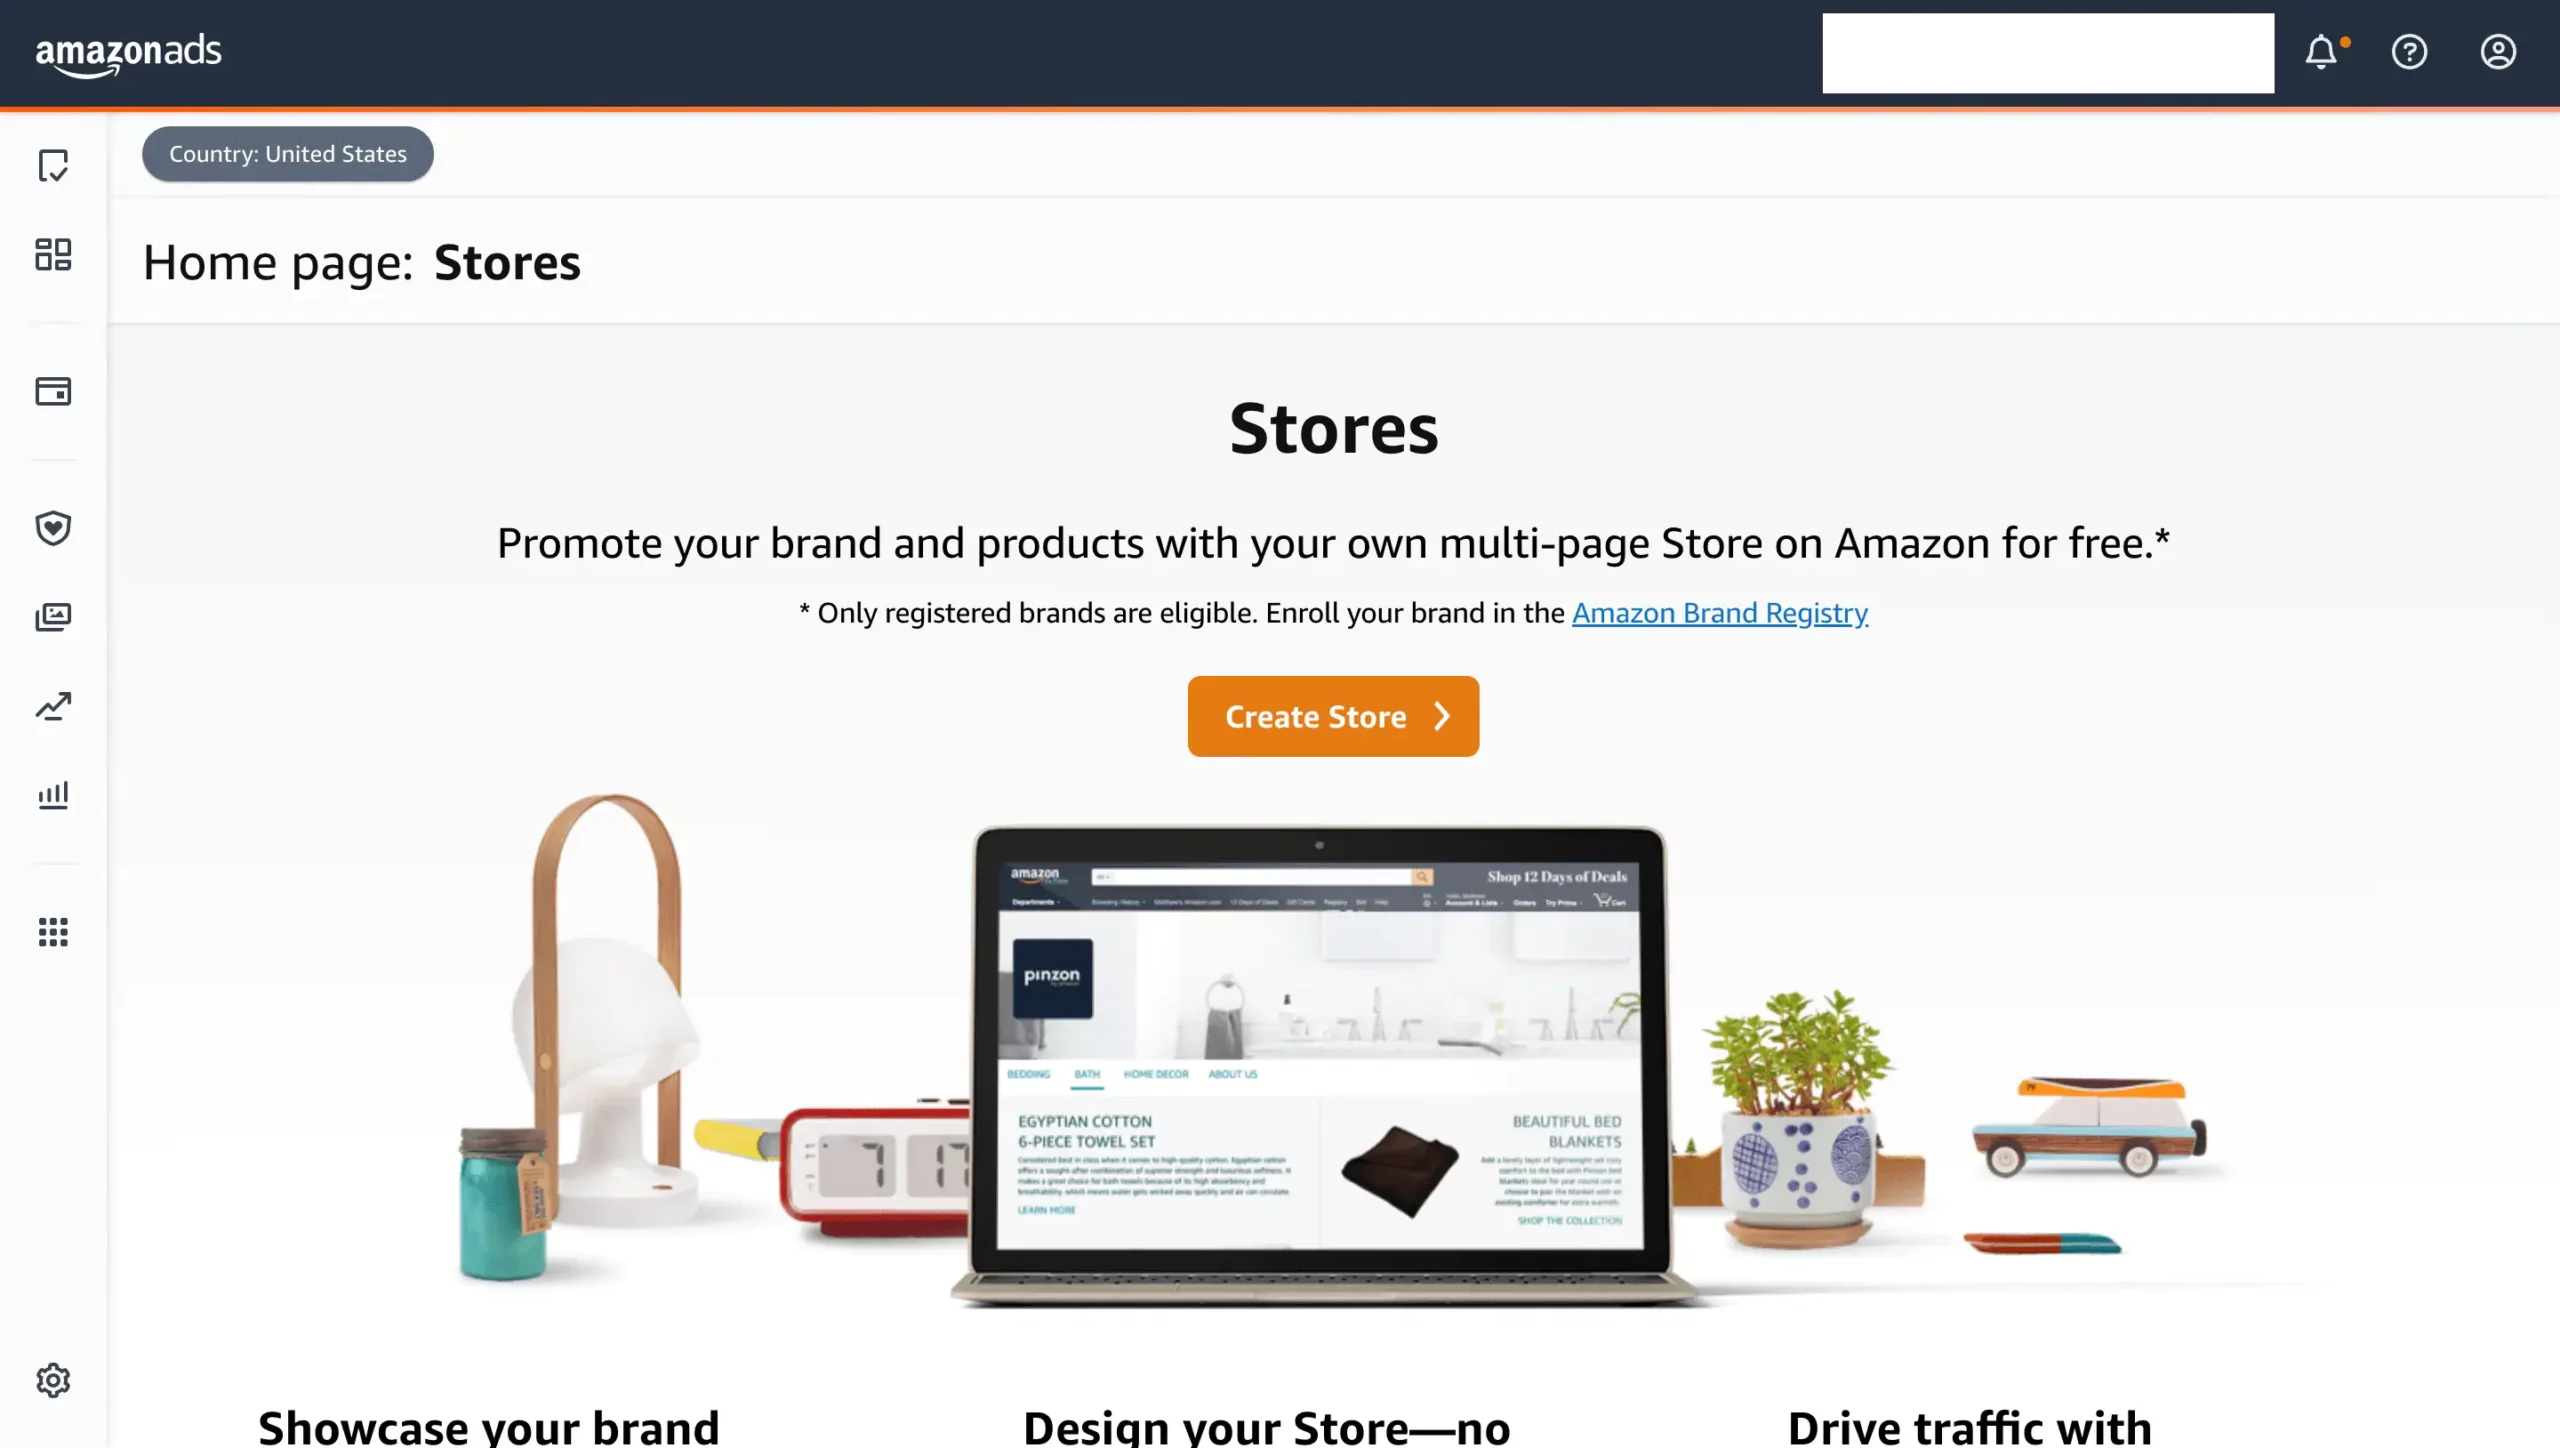
Once this is done, you’ll be taken to the Store builder. You’ll now be required to add your brand’s display name and logo. After you’ve added them both, click Next.
Step 2: Create Your Homepage
The next step in learning how to make an Amazon storefront is to create a compelling homepage since this is what your customers will see first. If you’re not sure exactly how you want it to look, never fear, Amazon already provides a few unique templates to choose from.
After you’ve decided on a template or created your own, you will then need to add a meta description to the homepage. This, in short, helps search engines like Google understand the purpose of your homepage. With a good meta description, you can help your Amazon store rank highly in Google and give customers some details about your brand and products.
Step 3: Build Your Store
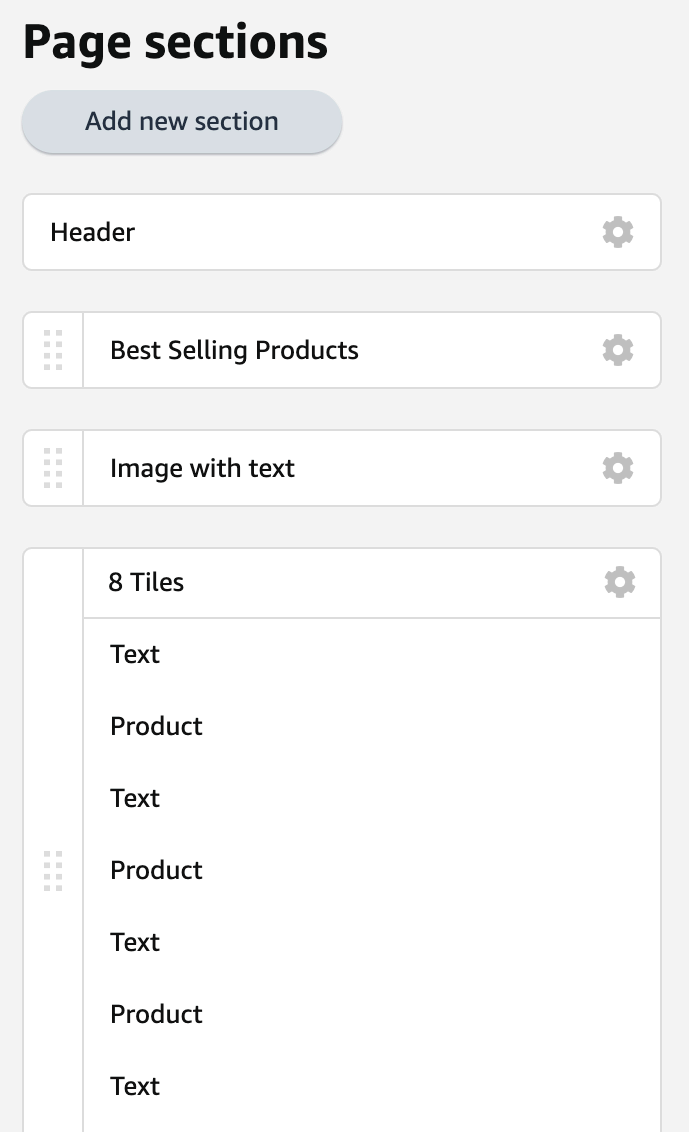
Once you’ve decided on a template and added a meta description, you can start building your own Amazon store! You can easily add pages, page sections, images, and thumbnails for your product listings here. Like the previous step, if you’re unsure how you want your storefront to look, Amazon provides some helpful templates to choose from.
How to Add New Subcategory Pages
On the left-hand side of the page, select Add Page.
Now, you’ll be prompted to enter the title you want for the new page along with a relevant description for the subcategory. You’ll also be required to choose a template.
Once this is finished, simply click Create Page to have your new subcategory page show up in your Store homepage in the form of a new tab.
To continue categorizing your products within a given subcategory, you can easily create a drop-down menu straight from the subpage’s tab.
More specifically, you can do this by clicking on the tab that you want to customize or change (located on the left-hand side of the screen), and then by clicking Add Page. Here, you’ll be able to add the drop-down option.
How to Add a Header
A key part of your page, a header allows you to easily establish your brand with a unique logo that lets the customer know at a glance that they’re at your store. Also, keep in mind that Amazon will let you know the correct size of the banner image or header directly in the upload widget.
To upload this banner image, you’ll want to click on the header section of your Amazon store near the top of the homepage screen.
After you successfully upload the image, every customer who comes to your Amazon storefront will see your image/logo and be reminded what store they’re in. This is important for building brand recognition.
Step 4: Customize Your Store
After initially discovering how to make an Amazon storefront and carefully building out the site, you can begin to customize it in many different ways by adding new sections to your homepage and subpages.
Within these sections, you can display product images, listing previews, videos, and text. To begin adding a new section, simply click on a blank tile (found either on your homepage or subpage) and select the desired tile type.
Keep in mind that Amazon provides many different tile types to choose from, but do not feel like you need to use them all!
After taking some time to familiarize yourself with the different tile types and what they do, you can then reposition them by easily dragging and dropping the tiles at multiple points on the page.
We recommend showcasing your entire product line within your Amazon store since it’s a great way to show off both your new and old products. An Amazon storefront can also be a great place to start showcasing any high-demand products on Amazon that you’ve found as it may increase the chance of them really taking off.
If you’re still unsure how to customize your page, take a look at some of your competitors to see how they’re doing it. Taking inspiration in this way can be a powerful method for learning the ropes and discovering what works.
Step 5: Submit Your Storefront for Review
After you’re finished building and customizing your Amazon storefront to your heart’s content, you’ll need to click the Submit for Publishing button. After this is clicked, and your storefront has been successfully submitted, you’ll have to wait for Amazon to review your store. This process usually takes less than 24 hours. After it has been approved, it will automatically be published on Amazon for everyone to see.
The Best Amazon Storefront Examples
Now that you know how to create a store on Amazon, let’s take a look at a few noteworthy examples for inspiration.
First up, we have a snapshot of Kleenex’s store display. They have prefaced the brand display with their brand logo and a light-hearted tagline, along with their product. We’ve entered their storefront with a good feel for their branding.

Next, we have Bissell’s store, and if there is one thing we know about Bissell it’s that they have a cleaning solution for every surface around your home. So as a customer, if I were to visit their store I would be overwhelmed by the amount of options they have available. They’ve done an incredible job at walking the customer through the decision-making process by categorizing their appliances by surface type. Earlier on in the blog, we talked about the importance of a well-organized store and easy-to-consume information, this is a perfect demonstration of that point.

Another way to preface your storefront design is to create a module with a lifestyle image that clearly communicates your brand message. In this case, Beats’ entire brand messaging is focused on providing their consumers with premium sound entertainment and this image beautifully encapsulates that messaging; whether you’re outdoors or going about your daily life, you will get premium and uninterrupted high audio quality. They’ve further supported the messaging with some icons and text to clearly point out their unique selling propositions to their buyers.

If you are a seller who is selling daily essentials or products that may need to be restocked throughout the year, well this is a great example. Tide has bundled all those products that buyers usually buy on the subscribe and save (SNS) model and placed them in one category. This not only gives buyers easy access to the product that they want to buy via SNS, but also gives them ideas on products that they could restock on or subscribe to the SNS model for.

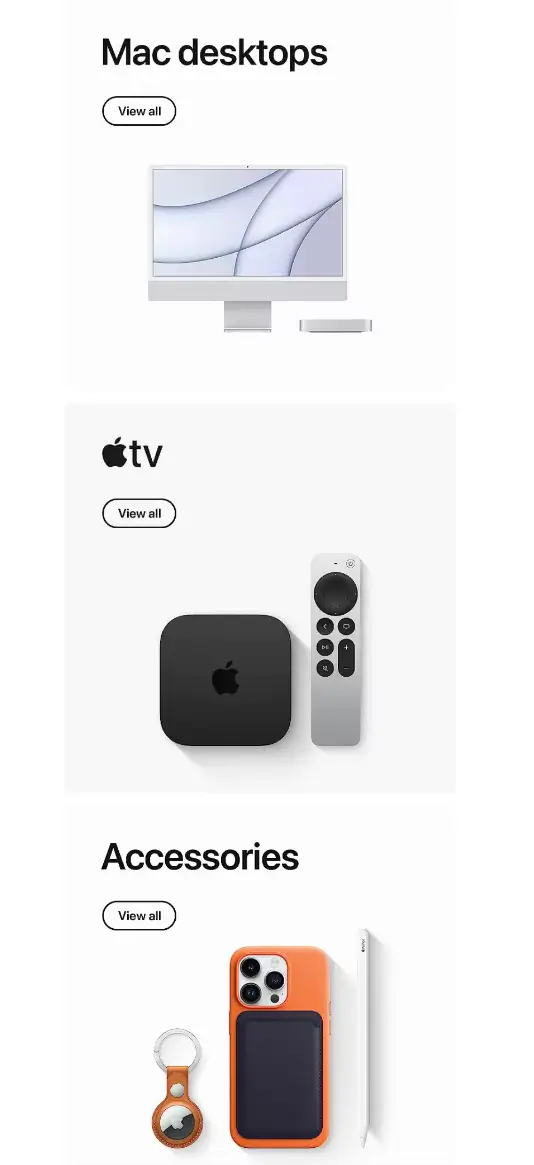
Apple is a brand that has a plethora of product categories that they sell in and has a plethora of options within each category as well. Instead of making their customers do all the work of searching for the products individually, among a sea of product descriptions and product images, they have made it convenient by organizing each device by category. A great strategy to employ if you have ASINs that are spread across multiple categories.
Back-to-school season is coming up and we all know that parents as well as school-going children will be beginning their shopping spree. Amazon Basics has employed a very smart strategy by creating a module allocated solely to this season. All sellers can learn from this strategy by mapping out all those seasons where their products could potentially be in high demand, and then closer to those seasons they can create a dedicated module for that occasion.

Conclusion
Now that you know the benefits, how to make a storefront, and you’ve reviewed some strong examples, it’s time to get started! But before you go, be sure to check out Helium 10’s suite of Amazon seller tools to take your business to the next level!
Frequently Asked Questions
Achieve More Results in Less Time
Accelerate the Growth of Your Business, Brand or Agency
Maximize your results and drive success faster with Helium 10’s full suite of Amazon and Walmart solutions.
