How to Set Up Facebook Offers To Distribute Amazon Single-Use Coupon Codes

Table of Contents
- Discover the steps to building Facebook Offers to send *ready to buy* customers from Facebook to your Amazon product listing.
- Step 1: Set Up Your Amazon Promotion
- Step 2: Set Up and Download Your Coupon Codes
- Step 3: Set Up Your Facebook Ad and Offer
- Step 4 (optional): Set A Facebook Rule
- How Soon Before My Facebook Offer Made A Sale?
Discover the steps to building Facebook Offers to send *ready to buy* customers from Facebook to your Amazon product listing.
Did you know that you could increase your Amazon sales exponentially through something as simple as creating Facebook offers for your product? Howdoes this fit in with Helium 10?
You’ve watched how Manny uses Helium 10’s Cerebro and Magnet to rank 🚀 products on Amazon using the Cerebro Product Rank formula (CPR). Then you discovered how to find a Custom 2-Step Storefront URL to target 🎯 specific keywords in your marketing campaigns.
The question now is, “How in the heck do I get all these coupon codes from Amazon into the hands of potential customers?” One easy way is to use – Facebook Offers.
If you don’t feel like reading, you can always watch this video tutorial instead. We cover the following topics in both formats:
- Multiple Amazon single-use coupon codes for a product
- A 2-Step Storefront URL to send Facebook traffic to (see these GEMS to create those)
- Create a Facebook Offer
- Create a Facebook Ad to advertise the offer and hook targeted customers
- Create a Rule so the Ad automatically turns off after a certain number of coupon codes have been claimed (optional)
- Discover how after only 48 impressions of the Ad, two offer codes had been claimed and resulted in one immediate sale 💰
- Bonus Not Shown In The Video: At the end of this article, I’ll show you where and how you can discover how many people actually used a coupon code
So with that, let’s get into creating Facebook offers, shall we?
Step 1: Set Up Your Amazon Promotion
The first thing we are going to do is set up our Promotion from within Amazon Seller Central (click here to view Amazon’s Guide).
Choose Advertising from the drop-down menu and then choose Promotions.
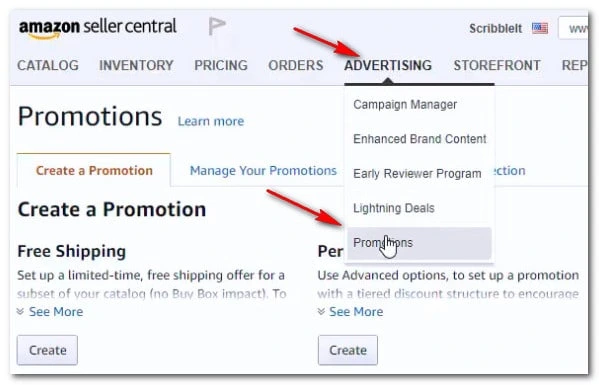
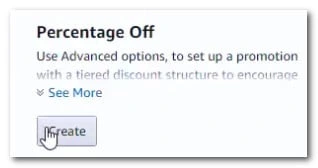
From there we want to create a Percentage Off promotion.
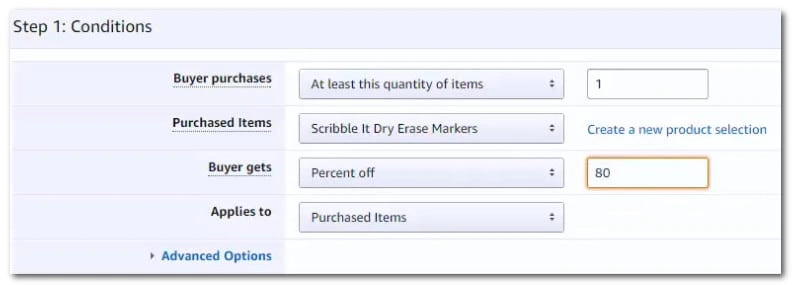
Next, you’ll choose your Promotion Conditions. In this example, we are promoting our Scribble It Dry Erase Markers and giving it an 80% Off discount.
Following that, you’ll want to pay close attention to your Start and End times.
When you first set up an Amazon promotion, it won’t be ready for use until 4 hours later…
So be sure to jot down the following promotion information:
- Start Date
- Start Time
- End Date
- End Time

After that, we will set up our Additional Options. For this example, we are going to create 100 single-use coupon 🏷 codes to distribute via a Facebook Offer.
Choose Single-Use claim codes and make sure the One redemption per customer box is checked.
⚠ Extremely Important! ⚠
Make sure the checkbox “Detail page display text” isNOT checked. This box should not be checked by default for single-use codes, but always double check to make sure this box does not have a checkmark on it.
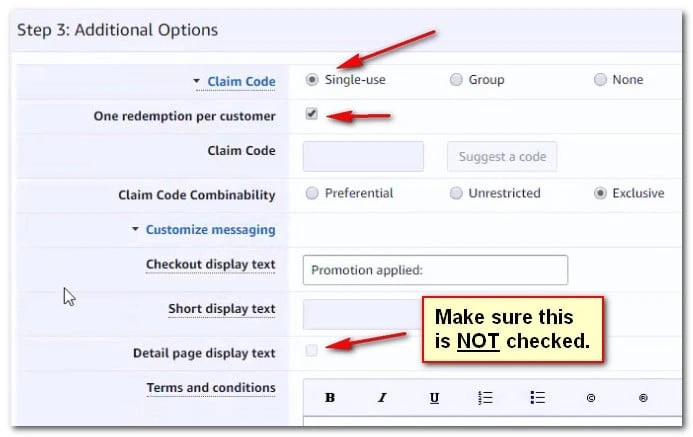
I had to learn this lesson the hard way. Here’s an interesting story…
When I was new to the whole Amazon thing, I once set up a Group coupon code for a $1 promotion and because I was naive (shouldn’t have used a Group Code), I didn’t know to click “Customize messaging” at the bottom to view and uncheck the “Detail page display text.” My $1 coupon code showed on my product listing page, and you guessed it…I lost my entire inventory for $1 per unit.
Even worse, since I was brand new, I had a shoestring budget and not only did I have to fork up more money for new inventory, but I owed Amazon something like $1500!
So the moral of the story is to be sure the “Detail page display text” is NOT checked.
Step 2: Set Up and Download Your Coupon Codes
Before we move onto creating Facebook Ads and Facebook Offers, let’s first generate the number of single-use coupon codes we need and download them to our computer (we’ll have to upload these codes to Facebook later on).
Go to Advertising > Promotions and then click Manage Your Promotions.
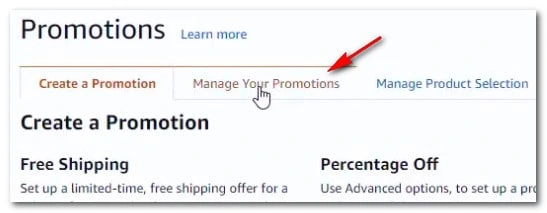
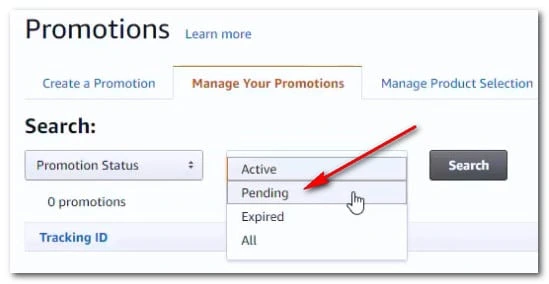
Under Promotion Status, choose Pending from the drop-down menu (if your promotion is currently active, then you will select that).
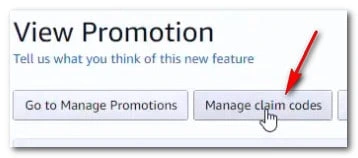
Click Manage Claim Codes.
Provide a Group Name and enter the number of coupon codes you want to hand out.
I usually enter more than what I need because, from my experience, you might hand out 20 coupon codes in one day. In reality, however, not all 20 people are going to use them. Therefore, I typically hand out a little more each day then what I want to be used.
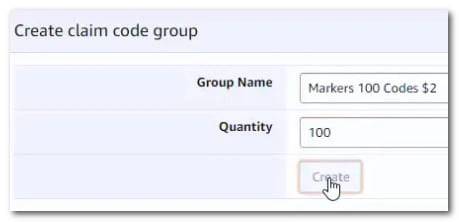
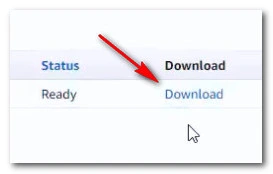
The final step is to download the coupons to your computer (you may have to refresh your browser a couple of times before the download link becomes available).
The file you download will be a zip file, so you’ll need to unzip it after downloading in some cases.
So just to recap…
Before you set up your Facebook Ad and Offer, make sure you have done the following:
- Set up your Amazon promotion
- Made a note of your promotion’s start time and date as well as end time and date
- Created and downloaded your single-use coupon codes
Now it’s time to head over to Facebook and set up both an Ad and an Offer.
Step 3: Set Up Your Facebook Ad and Offer
❓What’s the difference between Facebook Ads and Facebook Offers, you ask?
Well, the Offer is what you’re offering people in your advertisement–a percentage off coupon for your product.
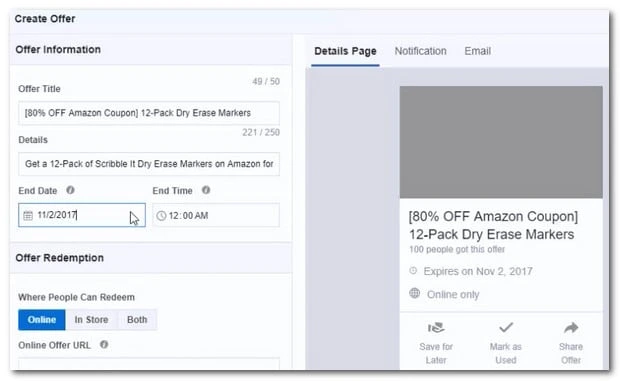
The Ad is what you use on Facebook to market the Offer (i.e. it’s where you target an audience and position your offer in front of).
I’ve written how to write killer Amazon Facebook ads in this post.
Here’s the Ad I ran in this example:
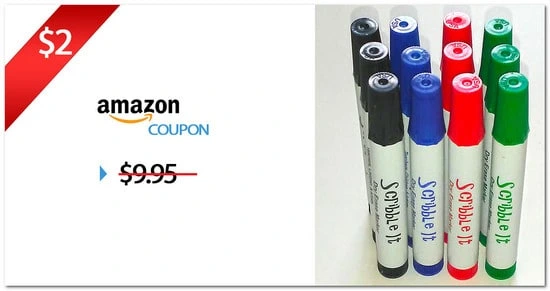
I should also mention that before you start using Amazon’s name in your advertising, you might want to take a look 👀 at their Brand Usage Guidelines. And while you’re at it, you can check out the Facebook Advertising Policies and Prohibited Content – Personal Attributes policies.
Remember that Facebook image files should be 1200px by 628px and once you put together an Ad image, head over to Facebook’s Ad Manager and create a campaign for Traffic consideration.
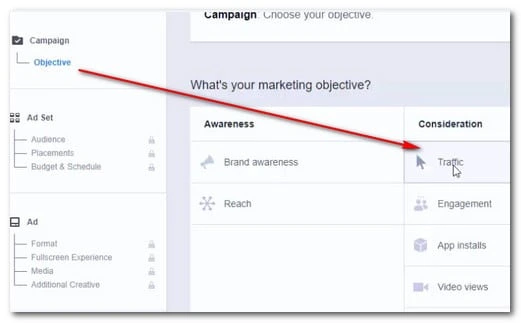
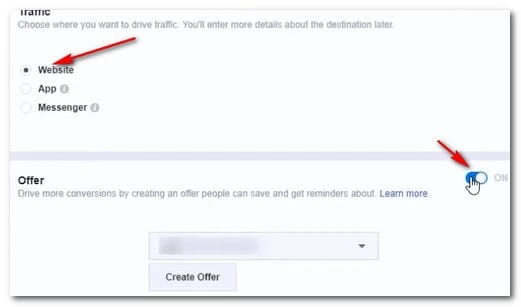
Afterward, you want to drive traffic to a Website and be sure to select the Offer option to the “On” position so you can create the offer (where we’ll upload the Amazon promo codes too).
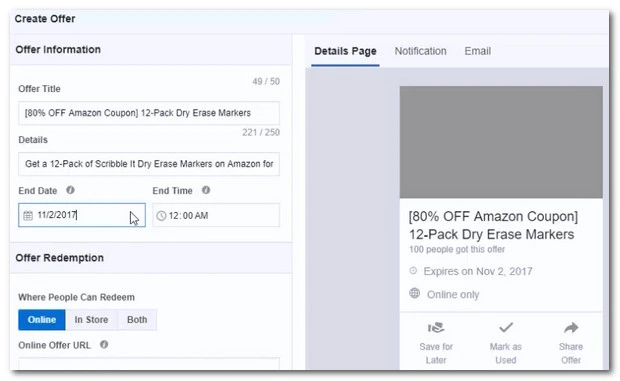
Now comes the time to create a Facebook Offer.
For more details on how to set Facebook offers up, jump ahead to 8:10 in the video above, but for now, here’s what you’ll need to set up the offer:
- Offer title
- Offer details
- End date and end time of the offer (be sure this time frame coincides with your Amazon promotion start times and end times)
- Offer URL (this is your Custom 2-Step Storefront URL or any other destination you want to send people to)
- Your list of single-use coupon codes
- A program like Excel or Google Sheets to edit a .csv file (spreadsheet file)
- Terms and Conditions of your offer (e.g. “One coupon redemption per customer”)
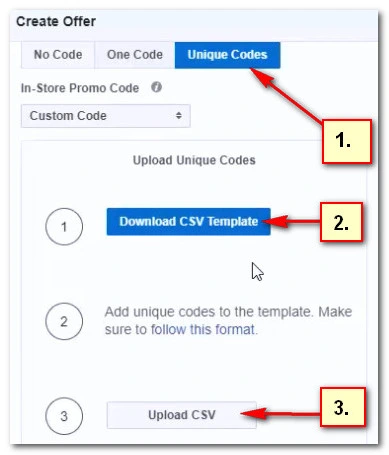
When you download the .csv file, you’ll want to paste your coupon codes into two columns–A and B, but starting in row 2. Jump to 11:30 in the video for more information about pasting in the coupons codes to the spreadsheet.

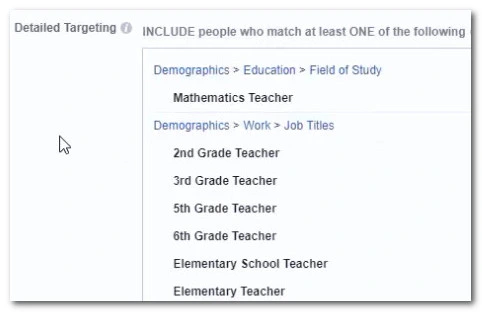
Once you’re finished creating your offer, you’ll head back to your Facebook Ad and set up your audience targeting. For this example, I decided to target teachers since I know many school rooms use dry erase marker boards (plus I’ve noticed some educational institutions buying my son’s markers).
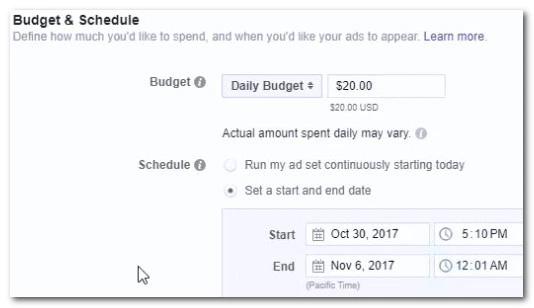
Next, you’ll need to set up your Ad Budget and Schedule.
In this example, I left the budget at $20 a day.
⚠ Pay real close attention to your scheduling of the Ad.
Remember that Amazon has a 4-hour delay from the time you create your promotion and the time it goes live. You don’t want to set up your Ad to run immediately if your Amazon promotion doesn’t go live for another three or four hours, so be sure to plan accordingly.
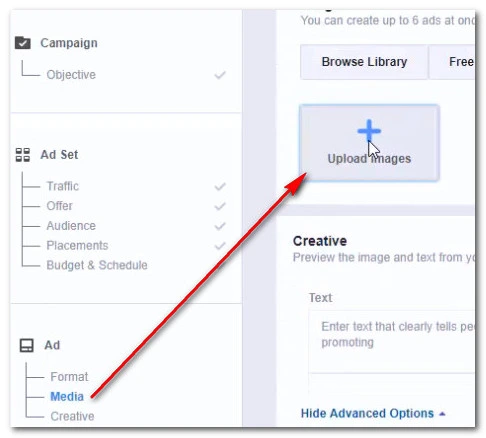
Once that is set, you can move onto uploading your Ad Image and creating the Ad Text.
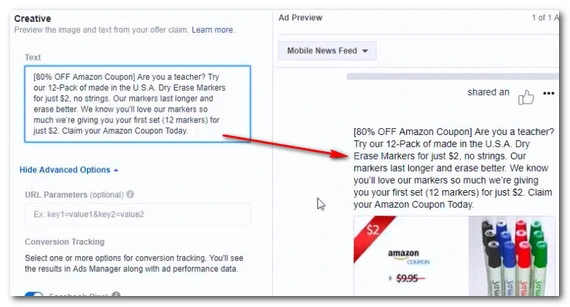
Click to create your Ad and if you did everything correctly, Facebook should approve your Ad shortly and it’ll be scheduled to run when your start time is reached.
Step 4 (optional): Set A Facebook Rule
This step is not required but could come in handy if you are unable to keep your attention on your Facebook offer while the promotion is running (if it’s a deep discount, I always keep a close eye on how many coupons have been claimed so I can turn the ad off when needed).
You can set up what’s called a Facebook Rule which in this case can be set to automatically pause ✋ your Ad should a certain number of Results (i.e. Link Clicks) be reached (see 18:40 in the video).
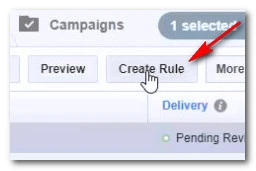
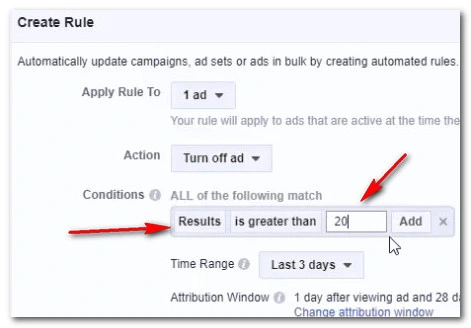
In the example above, I’m setting up a Rule to automatically pause my Facebook Ad after more than 20 people have clicked on my ad. This doesn’t necessarily mean 20 coupons have been handed out, just that 20 people clicked my ad.
It’s not a perfect science and truth be told I usually don’t set up a Rule when I do my promotions because I keep a watchful eye on them, but the option is there if you want to use it.
Finally, give your Rule a name and then you’re all set to start handing out coupons via your Facebook Offers.
⚠ Just remember if your Rule pauses your Ad, you’ll need to manually reactivate it the next day or whenever you want the Ad to begin running again. If this gives you a problem (like if you try reactivating your Ad while the Rule is still in effect), then you can go back to the Rule and delete it.
How Soon Before My Facebook Offer Made A Sale?
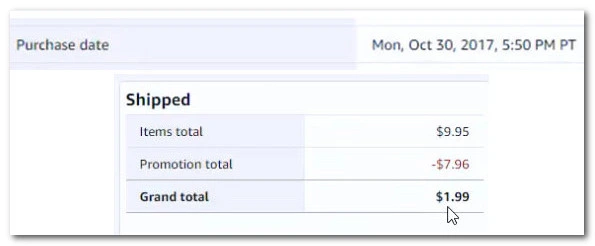
As you can see near the end of the video above, after about 40 minutes from the time my Ad began running, one of my coupons had been claimed which turned into a sale on Amazon.

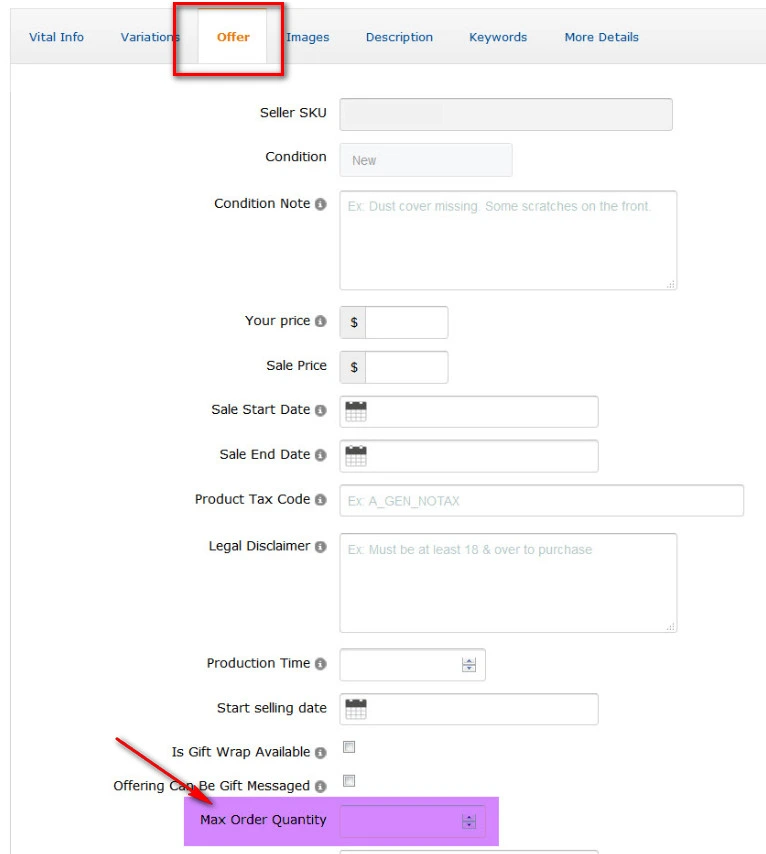
👉 Tip: When doing promotions with your Facebook offers, it’s a good idea to find a way to limit how many units a customer can order at one time. One way to do this is to set your product’s “Max Order Quantity” in your product’s “Offer” tab to the maximum number of units you want people to be able to order at one time.
One thing to watch out for when setting your maximum order quantity is 3rd-party applications which also manipulate this number. For example, you can set your Max Order Quantity in Helium 10 and Manage by Stats.
So what happens if you set your Max Order Quantity in Seller Central to 2 and Manage by Stats has it at 10? My advice is to make sure these values are the same and after you’re finished with the promotion, go back in and change these numbers to a value you are normally comfortable with.
So now that you know how to create Facebook offers to distribute your coupon codes, you might want to brush up on your Facebook Ad skills to entice people to click your Ad and claim those offers.
Achieve More Results in Less Time
Accelerate the Growth of Your Business, Brand or Agency
Maximize your results and drive success faster with Helium 10’s full suite of Amazon and Walmart solutions.
