How to Create an Amazon Seller Account in 7 Easy Steps in 2025


Table of Contents
- Introduction
- 5 Steps Before You Get Started Creating an Amazon Seller Account
- 1. Figure Out Your Business Model
- 2. Choose Your Fulfillment Method
- 3. Identify Your Supplier
- 4. Choose Your Seller Plan
- 5. Compile Your Product and Store Information
- How to Create an Amazon Seller Account in 7 Easy Steps
- 1. Visit Amazon Seller Central and Click 'Sign Up'
- 2. Select 'Create Your Amazon Account'
- 3. Verify Your Email Address
- 4. Select Your Business Location and Business Type
- 5. Enter Seller and Billing Information
- 6. Enter Your Products & Store Information
- 7. Verify Your Identity
- 6 Additional Tips for Creating a Successful Amazon Business
- 1. Go Through Freedom Ticket
- 2. Leverage Black Box for Product Research
- 3. Find a Good Manufacturer and Test Product Quality to Verify
- 4. Sign Up for Amazon Brand Registry
- 5. Sign Up for the Amazon Vine Program
- 6. Run Amazon PPC Ads
- Conclusion
Introduction
If you’re reading this article, you’re likely embarking on a new journey of becoming an Amazon seller. Before we dive into the essential steps to create an Amazon seller account, we want to congratulate you in taking this big step towards financial freedom! The world of Amazon selling is very challenging and competitive, yet as you grow your skillset, you’ll get to a place where you’re confident in your ability to ‘swim with the sharks’ and compete at the highest level. Over time, you’ll get to a place where your daily and weekly tasks become automatic, and you don’t even have to think about what you’ll do next. The real key here is consistency in dedicating focused time to learning how to sell and grow your Amazon store, along with the willingness to invest your hard-earned money into it. If you check those boxes, then let’s get started!

Outclass Your Competitors
Achieve More Results in Less Time
Maximize your results and drive success faster with Helium 10’s full suite of Amazon and Walmart solutions.
Sign Up for Free5 Steps Before You Get Started Creating an Amazon Seller Account
Before you create an Amazon seller account, it’s important for you to get your ducks in a row so that you can fill out the forms properly. We cover those pre-work steps below:
1. Figure Out Your Business Model
The first step before you create an Amazon seller account is to figure out your business model. There are a number of different business models you can leverage when starting out, such as private label, wholesale, online arbitrage, retail arbitrage, dropshipping, or through Amazon Handmade.
For a full list of business models, read our blog post discussing 14 ways to make money on Amazon!
Private Label: Private labeling requires the highest amount of expertise and also requires a 10-20k initial investment to do it well. The most profitable Amazon sellers out there tend to be the ones who sell private label products, so it’s certainly something you can start with or utilize other strategies to build your capital for a private label brand.
Drop Shipping: You may think Amazon drop shipping is a good avenue, but it’s much tougher than you may think. It’s very difficult to find a drop shipping supplier that offers high-quality products in a timely manner. You would also be operating off of FBM rather than FBA, which puts you at a disadvantage in ranking well within Amazon’s search engine.
If you don’t have enough capital to invest in a private label business, we typically recommend getting your feet wet with retail arbitrage to start building your capital. It’s a great way to experiment with different products and learn the process without over-committing all of your resources while you’re still learning.
To find a good product for retail arbitrage, you should download an Amazon barcode scanner app, visit your local Walmart or Target, and start scanning away. What you should be looking for is a significant price difference (the store’s price being much lower than the price on Amazon).
Once you’ve compiled a good list of options, you should go home, jump on your computer, and leverage Helium 10’s software suite to analyze product viability. You can use the profitability calculator and the FBA calculator within our Chrome Extension to analyze the feasibility of making out well with the product, Xray to analyze sales metrics (number of sellers, revenue estimates, etc.), Review Insights to see what customers are having issues with (leverage ChatGPT to summarize the pros and cons and to get the overall sentiment of how people feel about the product), and so much more.
Pay special attention to the number of sellers; the problem with reselling through retail arbitrage is that there could be 10+ resellers all vying for the Buy Box. You want to keep the number of sellers within the 1-3 range, less than 4 stars in terms of reviews, a low number of reviews, published recently, etc. You can see all of these metrics within Xray.
2. Choose Your Fulfillment Method
Once you’ve figured out your business model and your product, it’s time to figure out your fulfillment method.
The two primary options available to you are Fulfillment by Amazon (FBA), or Fulfillment by Merchant (FBM). There are benefits and drawbacks to both FBA and FBM, but we highly recommend choosing FBA because the benefits largely outweigh the costs.
FBA allows you to participate in Amazon Prime which results in faster shipping times (something Amazon customers tend to expect at this point). Slow speed times could result in negative reviews, which may impact your ability to convince customers to buy and will also hurt your ability to rank well in Amazon’s search engine. Amazon also shows preference in their search engine for FBA, so it naturally makes sense to stick with FBA.
3. Identify Your Supplier
Now that you’ve figured out your business model, product, and shipping method, it’s time to find a supplier for the product. If you’re doing retail arbitrage, then that’s simple – your supplier is Walmart, Target, etc. But if you’re using a private label business model, you’ll need to find a supplier. Within our Chrome Extension, we have a Supplier Finder feature that enables you to pull up your competitors’ products directly within Alibaba and find suppliers that way. Alibaba is a great place to start, but you can leverage our ‘4 Steps to Find the Best Amazon Supplier for Your Private Label Business‘ article to find another supplier if Alibaba doesn’t suit your needs. Be sure to have the product inspected before you start buying in bulk, and be aware of the fact that if you negotiate the price down, it may result in a lower-quality product, which you should avoid at all costs. A lower-quality product will likely result in negative reviews (especially when you’re using the Amazon Vine Program), so you should avoid low-quality products at all costs.
4. Choose Your Seller Plan
Next up is selecting your Amazon seller plan. There are two options: the individual seller plan and the professional seller plan. You can visit Amazon’s page that breaks down the pricing structure for both here.
To win the Buy Box, you’ll need to be on a professional seller plan, which is what we recommend when getting started with retail arbitrage.
For a full breakdown, check out our ‘Amazon Individual vs Professional Seller Plans‘ article.
5. Compile Your Product and Store Information
In the earlier steps, you’ve already done a bit of keyword research using Cerebro, but now it’s time to conduct thorough keyword research, build out your product description, gather high-quality photos, and compile information for your Amazon storefront.
Cerebro is a great place to start for keyword research, but you should also be leveraging Magnet to conduct exploratory keyword research. Our free Amazon keyword tool will give you a taste test of what’s available, but we highly recommend signing up for a free account to access more data within Magnet. To see all of the information at your disposal, consider signing up for one of our paid plans!
From here, you should use Listing Analyzer to see where your competitor is slacking in terms of keyword targeting, and use Listing Builder to create a better version of the listing. You could technically wait on this step until after you create the Amazon seller account, but it’d be good to get it all ready ahead of time.
In terms of Amazon product photography, you should order some samples of the product and leverage the best practices we’ve outlined in the linked article to set your product up for success. Don’t underestimate the impact of high-quality product imagery; it can make or break your listing’s performance.
In terms of making a great Amazon storefront, we’ve outlined some steps you can take to put your best foot forward in the article we linked to, but you don’t need to go overboard with this in the initial stages; all you really need is a minimally viable store description and you can circle back to it at a later date.
How to Create an Amazon Seller Account in 7 Easy Steps
Now we get to the fun part – creating the account! Below you’ll find the 7 easy steps you need to take to get your Amazon seller account up and running.
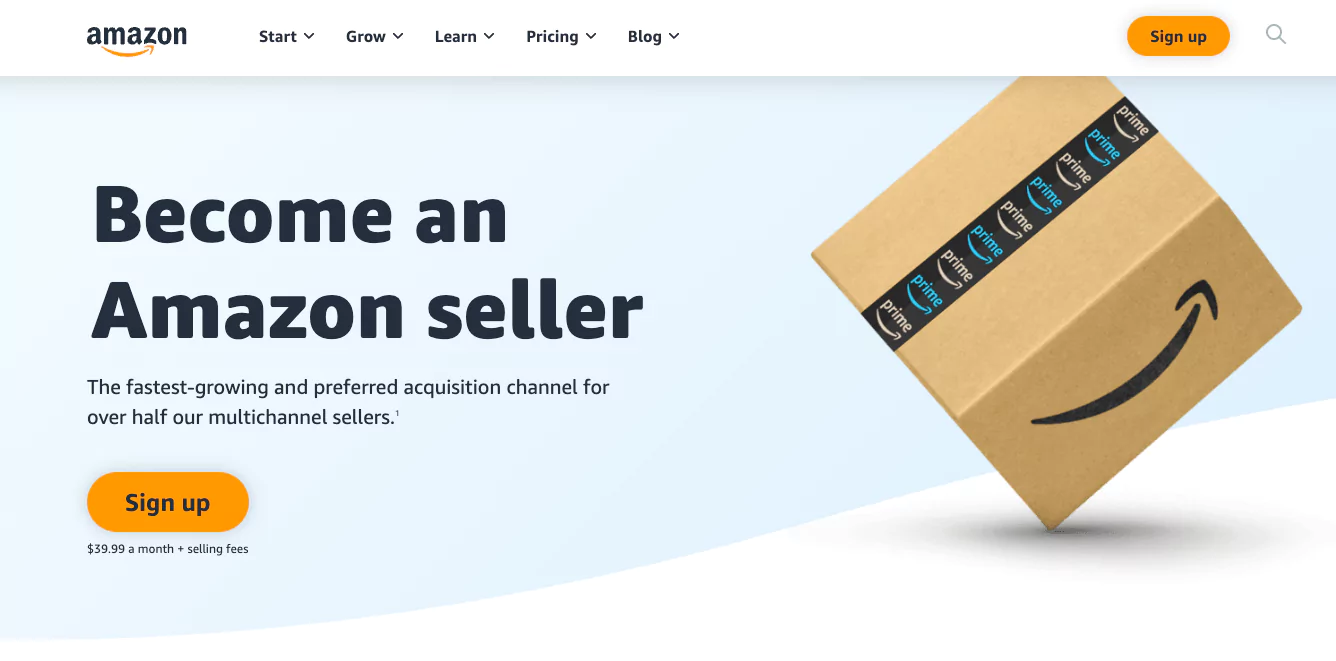
1. Visit Amazon Seller Central and Click ‘Sign Up’
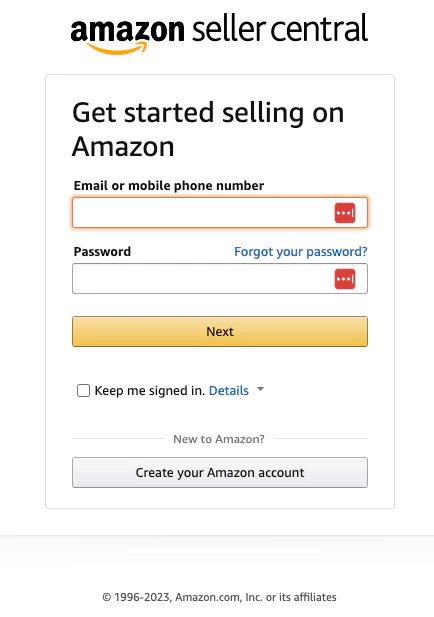
2. Select ‘Create Your Amazon Account’
3. Verify Your Email Address
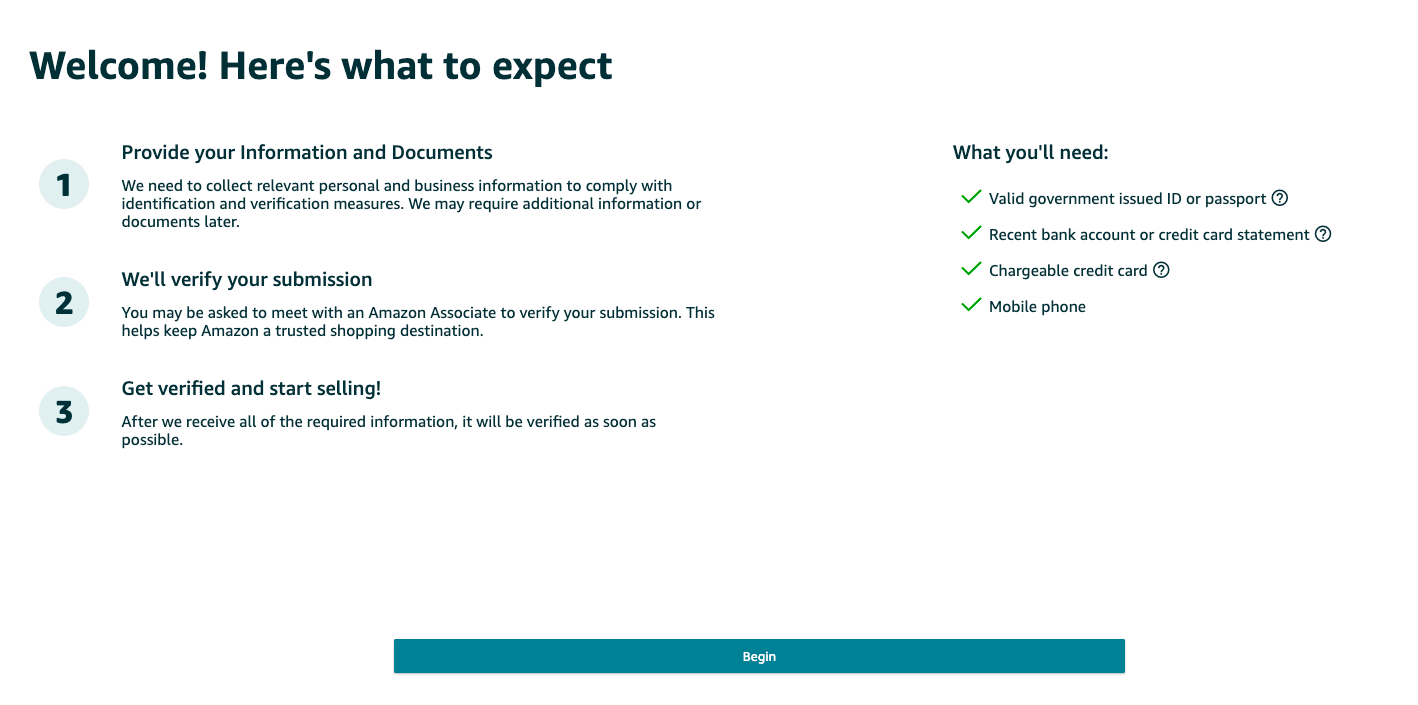
Once you input that information, Amazon will send you a code to verify your email. After you have entered that code, you will be taken to this screen. This page informs you what you will need to complete your account registration: A valid government-issued ID or passport, a recent bank account or credit card statement, a chargeable credit card, and a mobile phone.
4. Select Your Business Location and Business Type
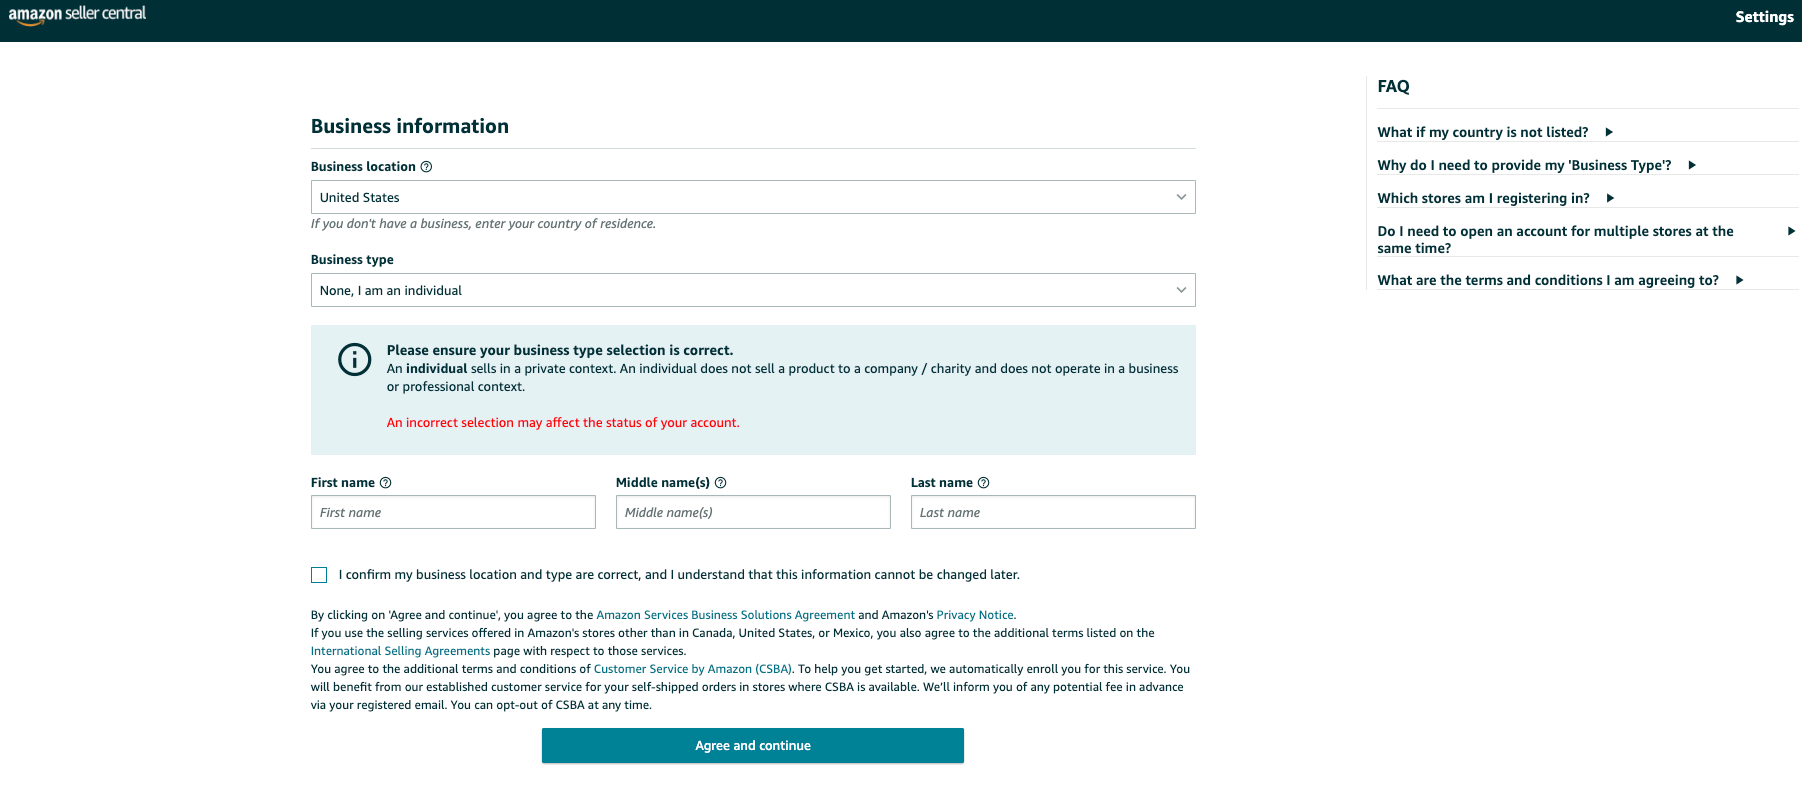
Next, you will choose your business location and your business type. For your business location, you must select the country in which your business is located. For your business type, you will choose from the following options: State-owned business, Publicly-owned business, Privately-owned business, Charity, or None, I am an individual.
For context, most sellers will choose privately owned businesses. If you haven’t created a business yet, select ‘None, I am an individual’.
5. Enter Seller and Billing Information
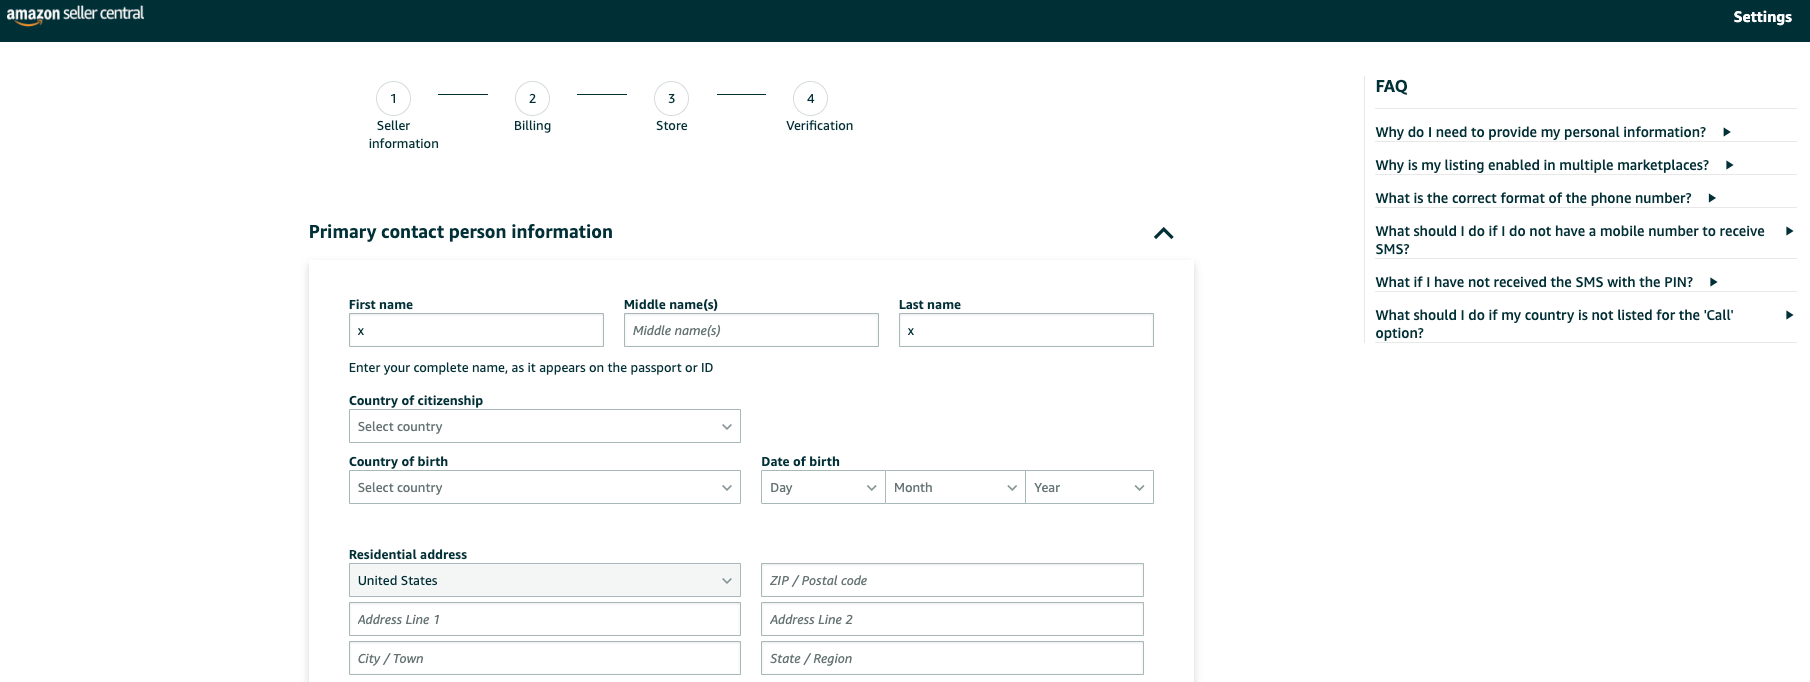
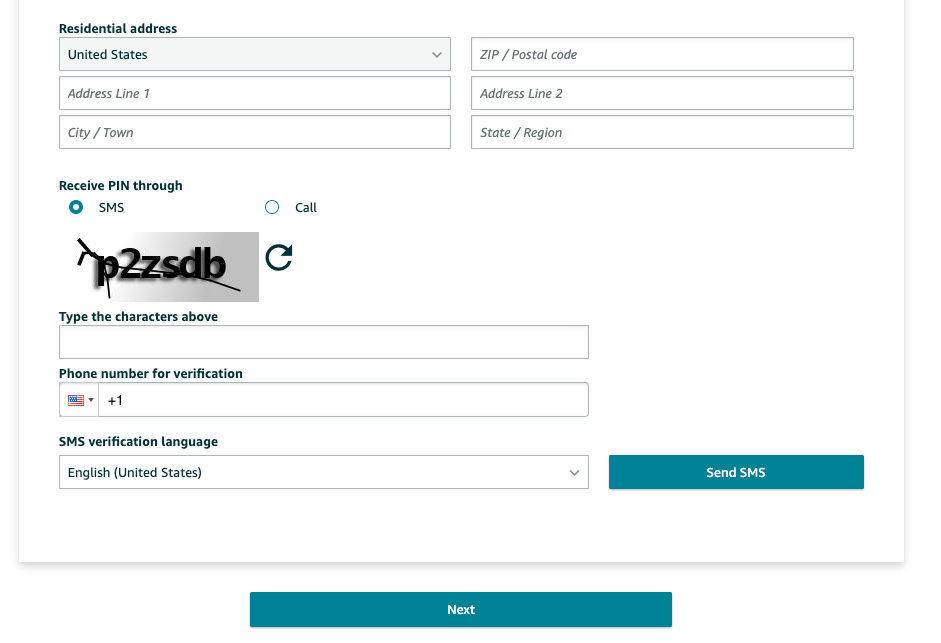
In this next section, you will need to enter some personal details so Amazon can confirm your identity, and have your information if they need to contact you. You will also need to verify your phone number through a text message or call. Amazon will send you a PIN and once you enter it, your number will be verified.
After this step, you will need to provide a valid bank account number so make sure to have your bank account information ready when going through this process. It will be used to deposit and withdraw money between your bank account and your Amazon payment account. It is important that your bank account is in the name of the primary contact or business name you provided earlier. Amazon will request you provide them with a copy of a bank statement to verify your bank information. You will also need to provide a valid credit card number which will be used to pay for your selling plan fees.
6. Enter Your Products & Store Information
After you provide your seller and billing information, you will next need to provide information about your product(s) and your Amazon store.
You will need to provide a name for your Amazon store (don’t worry, you can change it in the future). Next, let Amazon know if you have UPC codes for your product(s) if you have any diversity certifications, and if you have the manufacturer or brand owner of any of the products you want to sell on Amazon.
7. Verify Your Identity
The final step will require you to verify your identity. This is so Amazon can ensure that the Amazon marketplace is a safe and fair place for both sellers and buyers. You will be required to upload a bank statement and an image of your ID, which can be a license or a passport.
Once you have submitted both of those, you will have to complete an Identity Verification via video call with an Amazon associate. During this call, the Amazon associate will verify all the information and documents that you provided. Once this video call is complete, you are finished with opening your Amazon seller account!
6 Additional Tips for Creating a Successful Amazon Business
1. Go Through Freedom Ticket
Freedom Ticket is an Amazon FBA course developed by Helium 10 in partnership with Kevin King, and it’s included with even a basic Helium 10 subscription. This course does not cost thousands of dollars like some courses you see online because we want you to be able to put your money towards your business. This course has also won awards as the best Amazon FBA course so you can rest assured that it is even better than courses out there that cost thousands. It’s designed in a way that takes you from an absolute beginner to becoming an expert in Amazon selling. Kevin has sold millions of dollars worth of products on Amazon, as well as multiple Amazon businesses. The old adage ‘those who can’t do, teach’ is not applicable to Kevin; he’s both an incredible seller with a proven track record of success, and he’s a great teacher as well.
It’s important to have mentors for anything you do in life if you want to be successful. And I will say, that the mentorship programs that Helium 10 offers through our online courses (Helium 10 Academy, Freedom Ticket, PPC Academy, and Exit Ticket), monthly expert trainings, in-person workshops, private Facebook/Slack groups, our Amazon seller forum, webinars, and podcasts are unmatched within the industry. Don’t be the type of person who stops learning after college; keep growing your skillset and you will find success in this life.
2. Leverage Black Box for Product Research
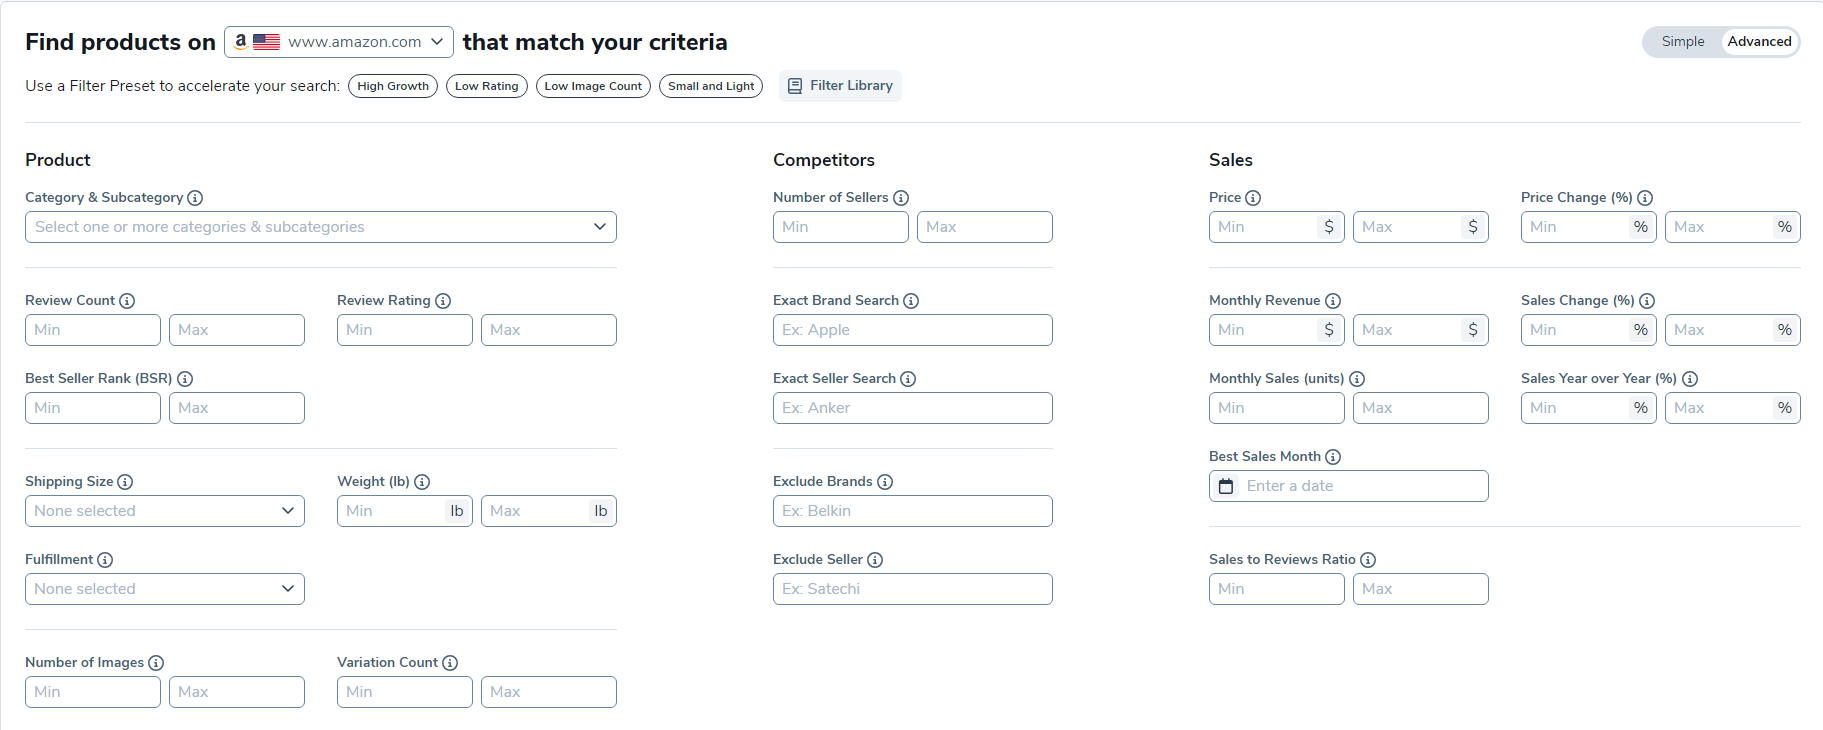
When getting into private labeling, I have no doubt that Black Box will become your best friend. It’s arguably the best tool out there for product research. Black Box gives you the ability to apply a wide range of filters to narrow down your options and find a winning product.
Here’s an example of filters you could apply within Black Box to find a viable product:
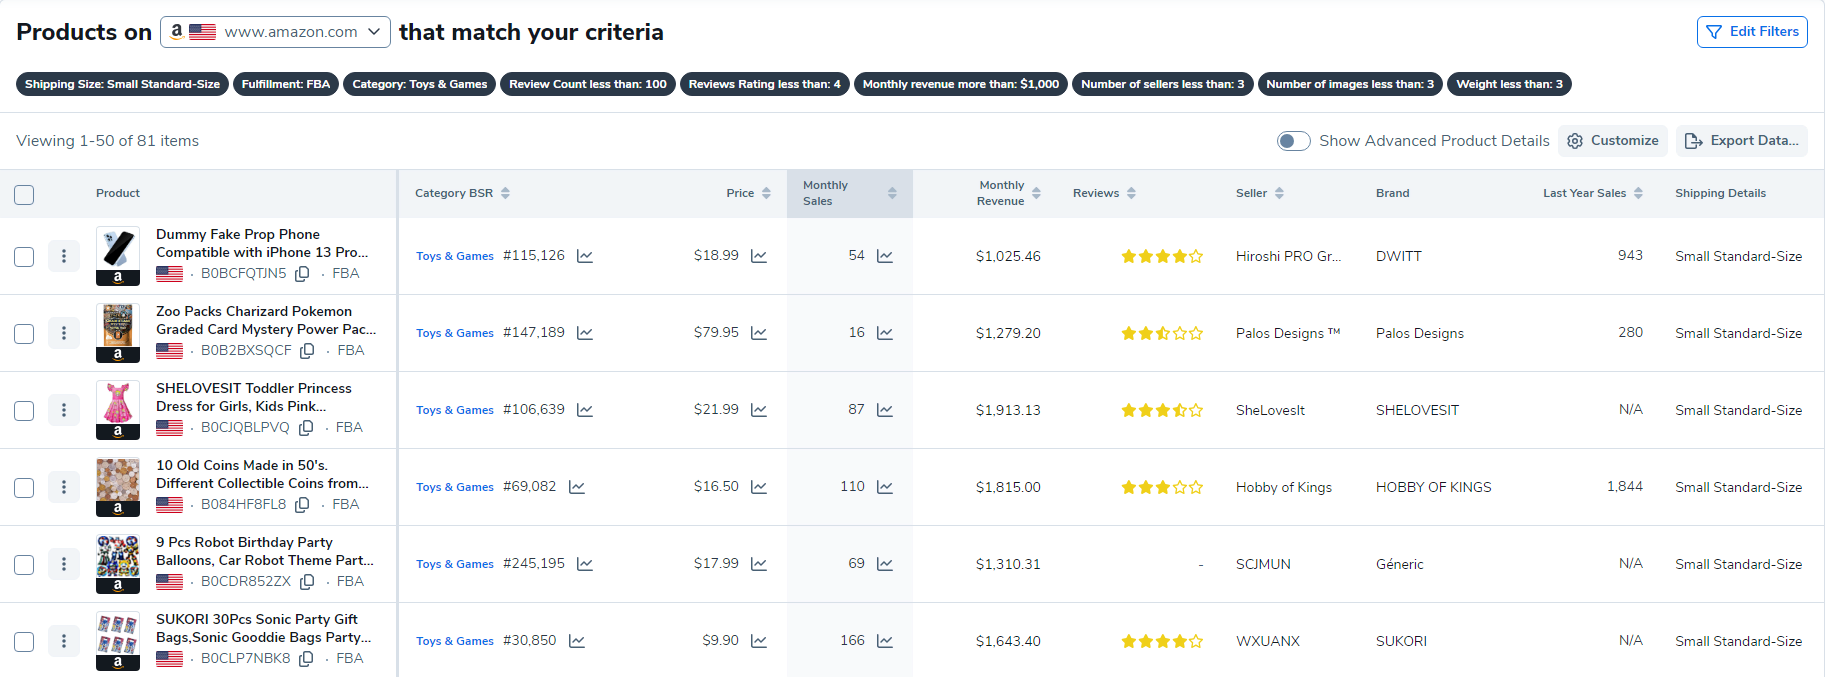
- Category & Subcategory: Toys & Games
- Review Count: Max = 100
- Review Rating: Max = 4
- Shipping Size: Small Standard Size
- Weight (lb): 3
- Fulfillment: FBA
- Number of Images: Max = 3
- Number of Sellers: Max = 3
- Monthly Revenue: Min = $1,000
And you’ll get of 81 products to sort through and analyze to find a winner.
Remember – the most important part of getting started in Amazon selling is finding a product that you can realistically compete with, that offers good margins, and that you can deliver a high-quality version of.
3. Find a Good Manufacturer and Test Product Quality to Verify
As we discussed previously, product quality is critical. There’s a direct correlation between the star rating of a product and its ability to convert traffic into sales. If you have a large number of former customers ripping into your product quality, it will be much harder for you to convert potential customers. It will also make it much harder to rank well in Amazon search for your target keywords. It all comes back to sales velocity and customer satisfaction; if those factors are missing, you likely won’t be as successful as you’d like with your Amazon business.
4. Sign Up for Amazon Brand Registry

Amazon Brand Registry is a free feature within Amazon Seller Central that will give you access to a host of benefits, such as the Amazon Vine Program (a way to build reviews quickly for new listings), the ability to create A+ content for your listings (which will help you increase your conversion rates), the ability to build out a fully branded storefront, the ability to bundle products together (to increase average sale value and sell products more quickly), and the ability to access a wide range of reports (Brand Analytics, Amazon Attribution, etc.) that will help inform your progress and strategy.
5. Sign Up for the Amazon Vine Program

The Amazon Vine Program is the ultimate cheat code for new Amazon sellers. It allows you to send your products to ‘product testers’ (you cover the entire cost; the product tester pays nothing) who will then use your product and write a review on the listing discussing the pros and cons of the product. Many Amazon sellers claim that these product testers are overly critical and rip into the product in the reviews, which ultimately damages their ability to sell. Yet the Amazon sellers who deliver high-quality products tend to have different experiences. That’s why it’s critical that you select a good supplier for your product offering.
Reviews are extremely important to perform well within Amazon search, and they’re also important for converting traffic into sales; potential customers naturally want to see what others think of the product before they buy themselves. That is why we highly encourage you to try out the Amazon Vine Program for yourself when getting started.
6. Run Amazon PPC Ads
Amazon Pay-Per-Click (PPC) is the best lever at your disposal to get sales quickly so that you can achieve a strong level of sales velocity and accumulate reviews that will be necessary to compete organically within Amazon search for your target keywords down the road. If your products don’t have any sales or product reviews, it will be extremely difficult to gain visibility for your product listings. While you’ll have to pay for every click you drive through Amazon PPC, I can safely say that it’s worth every penny so long as you do everything else we’ve mentioned in this guide.
Conclusion
Selling on Amazon requires much more than creating an Amazon seller account; it requires an innate ability to learn, adapt, and execute. Those of you who are highly analytical and question everything (whether it be why a product was a success or a failure) while having the grit to persevere through the early failures are the ones who will ultimately succeed in this endeavor.
We wish you the best of luck, and hope that you found this Amazon seller account guide useful!
Frequently Asked Questions
Achieve More Results in Less Time
Accelerate the Growth of Your Business, Brand or Agency
Maximize your results and drive success faster with Helium 10’s full suite of Amazon and Walmart solutions.
